I have been doing my Joomla extension development on my Macbook Pro for the last 8 years, and my setup involves some very simple tools. On my Mac, I used MAMP and BBEdit. My workflow involves using Git for version control, MAMP for testing my extension on Joomla, and Phing for building the extension. Recently, I have decided to migrate some of the work to a Windows 10 laptop, and I decided to go with WAMP Server 3.1.6 64 bit as my server testing environment.
So after installing WAMP Server on my Windows machine, I needed to setup Phing. I wanted to share my process of setting it up because I encountered some problems along the way that took quite a bit of searching to figure out. So, I hope that my steps below will help someone to have a smooth installation of Phing on their Windows machine.
Step 1 – Setup PHP in your PATH Environment Variable
The point of using Phing is to be able to call it from the command-line from any directory on Windows, or more specifically the folder that you are developing your Joomla extension files in. To accomplish this you have to set up two paths in your Windows PATH Environment Variable. The first path is to the PHP executable, and the second path is to the Pear bat file. This also makes this entire installation process much easier. To do this, please do the following:
- On Windows 10, click on your Start icon or press your Windows key on your keyboard.
- Type “environment” and the system should automatically search for it and display the following app link “Edit the system environment variables. Control Panel“. You can also access this via the “System” icon in the control panel, then clicking on “Advanced system settings” then on “Environment variables“
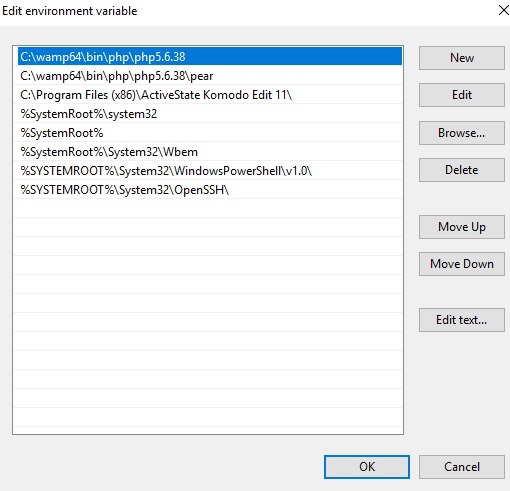
- In the Environment Variables dialog, click on the “Path” variable in the (lower) “System variables” section. once that row is highlighted, click the “Edit…” button.
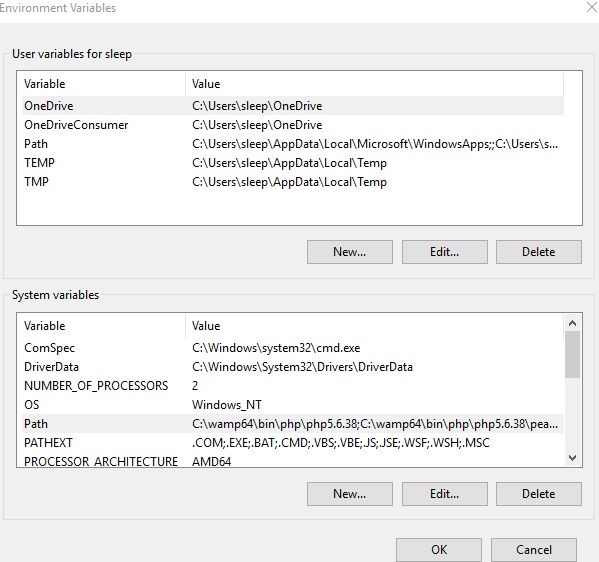
- In the “Edit environment variable” dialog, click “New” and type the location of your PHP CLI executable. This should be “C:\wamp64\bin\php\php5.6.38“. Although WAMP Server typically uses PHP 7 for CGI/SAPI purposes, it uses PHP 5 for CLI functionality.
- Add the second environment variable to the Path by clicking “New” again, and typing “C:\wamp64\bin\php\php5.6.38\pear” Then click “OK” to complete the addition, and “OK” again on Environment variables dialog to close it.
- After adding the paths, you should test that the path variables work by opening a Command Prompt as Administrator and checking the PHP version. To do this, click on the Windows Start icon, and type “cmd“, when the “Command Prompt” app shows, right click on it, and select “Run as Administrator“. Once the command prompt opens type “php -v” and it should look like this:

Step 2 – Install Pear
Our next task is to install Pear into our WAMP Server PHP 5 installation. To accomplish this, we need do do the following:
- Download the Pear phar package from: http://pear.php.net/go-pear.phar
- Save the go-pear.phar file in the PHP 5 folder: C:\wamp64\bin\php\php5.6.38
- In the Command Prompt (as Administrator), type “php -d phar.require_hash=0 go-pear.phar” and then press Enter. As a side note, you need to add the “phar.require_hash=0” option to turn off the requirement for the Phar archive to have some kind of signature (MD5, SHA1, SHA256 or SHA512). If we did not include this option then we would have gotten an error that the archive does not have a signature.
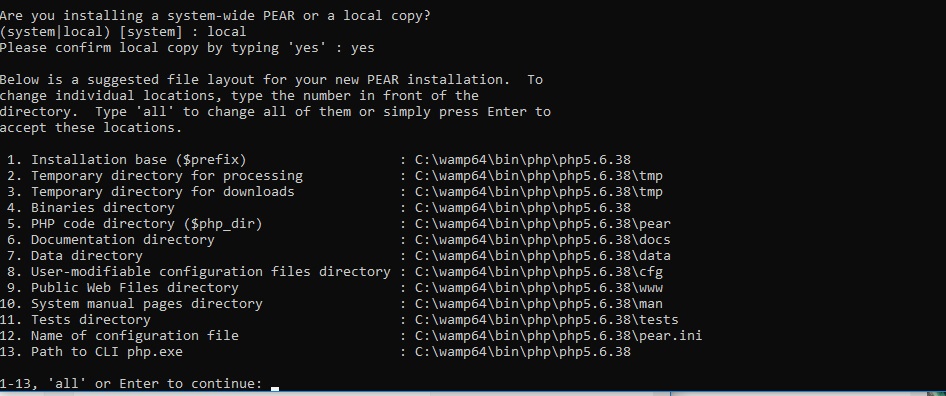
- After pressing Enter, you will be asked, “Are you installing a system-wide PEAR or a local copy? (system|local) [system]:“. Type “local” and press Enter. Next, you will be asked, “Please confirm local copy by typing ‘yes’ :“. Type “yes” and press Enter. You should next see a list of locations labeled 1 to 13, and asked to type “1-13, ‘all’ or Enter to continue : “. Just press Enter.
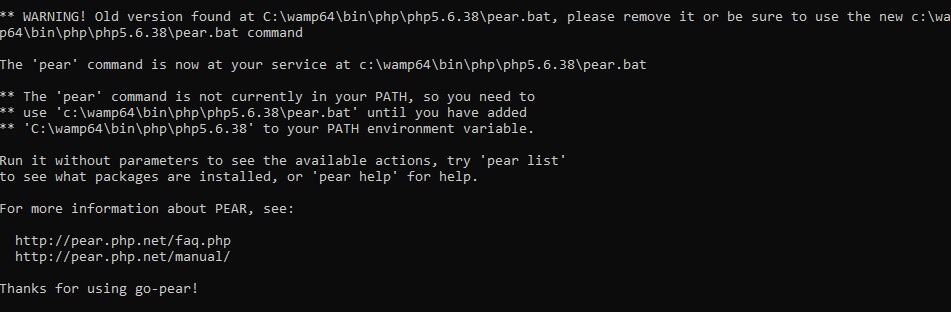
- After pressing Enter, a pear.ini configuration file will be created, and PEAR will be installed. After installing PEAR packages, you will be asked, “Would you like to alter php.ini


Step 3 – Edit the Configuration Files
Before the final step of installing Phing, we have to edit both the PHP.ini file and the pear.bat file. Both are located in C:\wamp64\bin\php\php5.6.38. So, go to that folder, and edit the files with Notepad or your preferred text editor:
- Open the PHP.ini file located in C:\wamp64\bin\php\php5.6.38. Press Ctrl + F and search for “include_path“, then add the line, “include_path = “.;C:\wamp64\bin\php\php5.6.38\pear”“. Save the PHP.ini file.

- Open the pear.bat file located in C:\wamp64\bin\php\php5.6.38. Go to line 28 and type “IF “%PHP_PEAR_SYSCONF_DIR%”==”” SET “PHP_PEAR_SYSCONF_DIR=C:\wamp64\bin\php\php5.6.38”“. This tells PEAR where its configuration file is located. Then save the bat file.

- After editing the configuration files, restart the WAMP Server services.
- Test the PEAR installation by typing “pear version” in the Command Prompt.

Step 4 – Install Phing and Use It
To complete our setup, we will install Phing directly now:
- Go to the Command Prompt (as Administrator), and type, “pear channel-discover pear.phing.info” and press Enter.
- Install Phing by typing the following in the Command Prompt, “pear install phing/phing” and press Enter.
- Test Phing by typing, “phing -v” and press Enter.
- Lastly, check for any upgrades by typing, “pear upgrade phing/phing” and press Enter.